Other
2008054 - Funny mirror

Dimensions product:
Height : 198 cm Width : 15 cm
Lenght : 125 cm
Dimensions shipping carton:
Height : 210 cm
Width : 25 cm Lenght : 135 cm
Packaging weight: ±60 kg
Complete including:
Plastic mirror.
Material specifications:
- This product is hand painted
- This product is made out of wood Not water resistant. Extra option: water resistant wood with varnish, against surcharge..
Assembly procedure:
- Place the mirror on place under a roof on a dry place.
- Screw the 2 mounting hooks in the wall
- On the back site of the mirror there are 2 eyes which you can attach the mirror to the wall.
Tip!
There's a possibility of a waterproof version, at an additional cost.
2003025 - Kids dressing table

Dimensions product:
Height :46,00 cm / 18,11 inches
Width :64,00 cm / 25,20 inches
Depth :138,00 cm / 54,33 inches
Dimensions shipping carton:
Height :50,00 cm / 19,69 inches
Width :69,00 cm / 27,17 inches
Depth :142,00 cm / 55,91 inches
Packaging weight: ?
Complete including:
2x Mounting brackets
Material specification:
This product is made of 5 to 6mm thick polyester, and is coated with a matt varnish. With this coating the product is resistant against all kinds of cleaning materials. We use the same coating on our products as been used in the car industry, so you can clean our products just like a car. (do not use an abrasive sponge) Also you can clean our products with water pressure.
Important tips for installation:
- Let your installation be performed by a specialised installation company.
- After mounting the product, put some putty around the product so water and dirt gets no chance to get behind the product, also for extra reinforcement.
- We advice you to use a silicon putty for gluing around the product and use a panel and construction adhesive for gluing the brackets beneath the product.
Assembly procedure:
- Place the mounting brackets against the wall - Attention!! The mounting brackets need to be placed so the table will clamps over the mounting brackets. (see section 3)
- Place putty on top and on the outside of the mounting brackets.
- Slide the table over the mounting brackets so the table will clamps a little. It's not possible to clamps the entire table because of the form of the product.
- Mount the product on top of the brackets with normal mounting screws (make sure the screws are not to long)
- After mounting the product, put some putty around the product so water and dirt gets no chance to get behind the product.
2003024 - Pelican dustbin
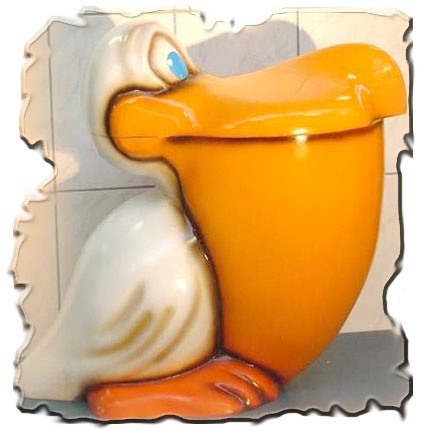
Dimensions product:
Height :69,00 cm / 27,17 inches
Width :74,00 cm / 29,13 inches
Depth :44,50 cm / 17,51 inches
Dimensions shipping carton:
Height :73,00 cm / 28,74 inches
Width :80,00 cm / 31,50 inches
Depth :48,00 cm / 18,90 inches
Packaging weight: 12,51 kg / 27,52 lbs
Complete including:
Trash can 20 ltr
Material specification:
Dit polyester product is 5 a 6mm dik.
Na decoratie is dit product afgevernist met een mat glanzende coating . Met deze coating is het product bestand tegen vrijwel elk reguleer poetsmiddel (bij twijfel raadpleeg het etiket). Wij gebruiken dezelfde coating die gebruikt wordt in de boot en auto industrie. U kunt ons product op dezelfde wijzen schoonmaken als een auto. (gebruik geen schuurspons) Ook kunt u ons product schoonmaken met waterdruk.
Important tips for installation:
- Don’t tighten the screw on the bottom of the pelican too hard. This prevents the product otherwise the product may crack if you tighten it too hard.
Assembly procedure:
- Take the bucket (trash can) out of the pelican
- Drill holes on the bottom of the pelican. (on the inside)
- Mark the holes on the floor en take the pelican away.
- Drill these marked spots in the floor and place plugs.
- Place the pelican back above the holes in the floor and mount the pelican on his place.
- Place the bucket (trash can) back in the pelican.


